To authenticate your Workday account, you will need to provide the following information:
-
WSDL
-
ISU Username
-
ISU Password
-
Workday Tenant Name
Prerequisites
Please ensure you fulfill all the requirements to set up the integration:
-
You have Administrator permissions in your company's Workday instance
-
You have the API add-on enabled in Coderbyte
Workday Initial Configuration
Create an Integration System User (ISU)
-
In your Workday portal, log into the Workday tenant
-
In the Search field, type Create Integration System User
-
Select the Create Integration System User task

-
On the Create Integration System User page, in the Account Information section, enter a user name, and enter and confirm a password
Important: "&", "<", or ">" characters cannot be included in the password
-
Click OK

-
To ensure the password doesn't expire, you'll want to add this new user to the list of System Users. To do this, search for the Maintain Password Rules task.

Add the ISU to the System Users exempt from password expiration field

-
Enter the Integration System User name in the linking flow
-
Enter the Integration System User password in the linking flow

Create a Security Group and assign an Integration System User
-
In the Search field, type Create Security Group

Select the Create Security Group task.
-
On the Create Security Group page, select Integration System Security Group (Unconstrained) from the Type of Tenanted Security Group pull-down menu.

-
In the Name field, enter a name
-
Click OK
-
On the Edit Integration System Security Group (Unconstrained) page, in the Integration System Users field, enter the same name you entered when creating the ISU in the first section

-
Click OK
Configure domain security policy permissions
-
In the Search field, type Maintain Permissions for Security Group

-
Make sure the Operation is Maintain, and the Source Security Group is the same as the security group that was assigned in Step 2

-
On the next screen, add the corresponding Domain Security Policies depending on your use case:

- If you are connecting Workday ATS (Recruiting) ATS (Recruiting) Permissions
Activate security policy changes
-
In the search bar, type "Activate Pending Security Policy Changes" to view a summary of the changes in the security policy that needs to be approved

-
Add any relevant comments on the window that pops up
-
Confirm the changes in order to accept the changes that are being made and hit OK

Validate the authentication policy is sufficient
-
Search for Manage Authentication Policies

-
Click Edit on the authentication policy row

-
Create an Authentication Rule

-
Enter a name, add the Security Group, and ensure Allowed Authentication Types is set to Specific User Name Password or Any

Note: You don't have to create a new Authentication Rule if you already have an existing one set to User Name Password or Any. You can add the ISU you created to that rule instead.
You will need to create a new rule if SAML is the only Authentication Rule you see for "Allowed Authentication Types."
Activate all pending authentication policy changes
-
In the search bar type, activate all pending authentication policy changes

-
Proceed to the next screen and confirm the changes. This will save the Authentication Policy that was just created or edited
Obtain the web services endpoint URL
-
Search in Workday for Public Web Services

-
Find Recruiting if you are connecting Workday ATS.
Click the three dots to access the menu. Click Web Services > View WSDL

-
Navigate to the bottom of the page that opens (it may take a few seconds to load)
-
Copy the full URL provided under RecruitingService (Workday ATS). The URL will have a format similar to
https://wd5-impl-services1.workday.com/ccx/service/acme/Recruiting/v46.0
Configure Workday Assessment statuses
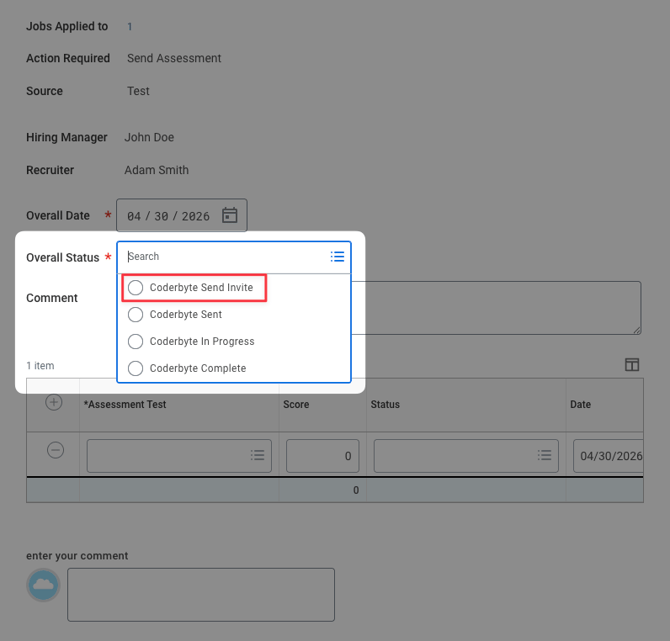
Step 1. Create Assessment Statuses
In Workday, search for Maintain Assessment Statuses and create the following four statuses. For each, set both Overall Status and Test Status, and ensure the Reference ID is set exactly as shown.
| Name | Reference ID | Overall Status | Test Status |
|---|---|---|---|
| Coderbyte Send Invite | CODERBYTE_SEND_INVITE |
Yes | |
| Coderbyte Sent | CODERBYTE_SENT |
Yes | Yes |
| Coderbyte In Progress | CODERBYTE_IN_PROGRESS |
Yes | Yes |
| Coderbyte Complete | CODERBYTE_COMPLETE |
Yes | Yes |
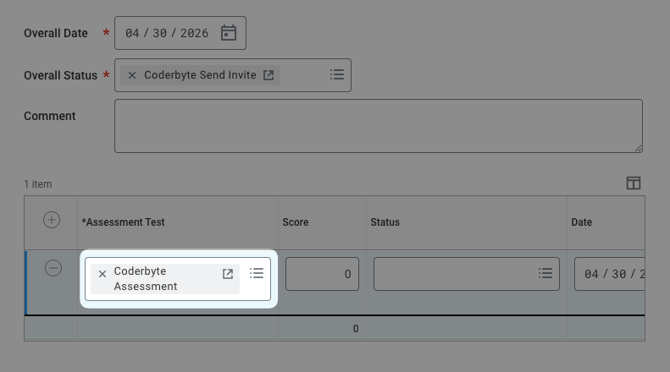
Step 2. Create an Assessment Test
In Workday, search for Maintain Recruiting Assessment Tests and create one entry:
| Name | Reference ID |
|---|---|
| Coderbyte Assessment | coderbyte_assessment |
This is a single generic entry - the specific test sent to each candidate is configured in your Coderbyte dashboard, not in Workday.
Step 3. Assess Candidate Stage
Ensure your job application business process includes an Assess Candidate step. This is the stage where Coderbyte's integration activates. Most Workday tenants have this step by default — confirm with your Workday admin that it is active for the requisitions you want to use with Coderbyte.
Step 4. Update ISU Permissions
Add the following domain security permissions to the security group used by your Coderbyte ISU:
| Domain | Permission |
|---|---|
| Assess Candidate | GET + PUT |
| Candidate Data: Job Application | GET + PUT |
| Candidate Data: Assessment Results | GET + PUT |
After saving, run Activate Pending Security Policy Changes to apply them.
Connect to Coderbyte
Once the Workday configuration is complete, navigate to Coderbyte dashboard and enter the following credentials in the Workday connection form:
- Workday SOAP endpoint URL
Example:https://wd5-impl-services1.workday.com/ccx/service/your-tenant/Recruiting/v46.0 - ISU username (in
username@tenantformat) - ISU password
Coderbyte will complete the connection and confirm when the integration is active.
Mapping Coderbyte assessments to Workday job requisitions
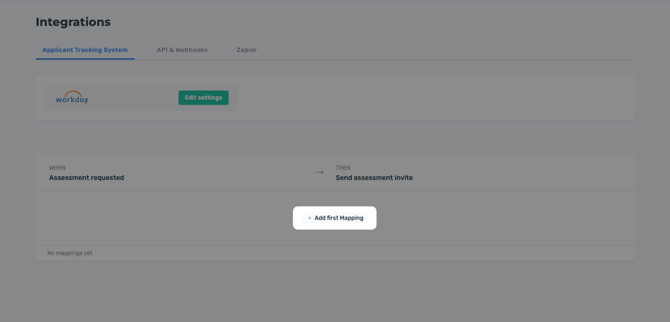
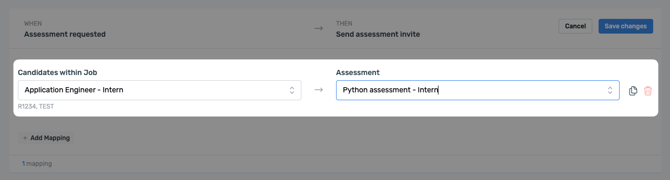
Inviting candidates to assessments